Extend Wi-Fi Range With ESP8266
on Solutions
Summer is coming and weather is will be too hot to stay inside.
Your Wi-Fi may be good but when the Wi-Fi signal face to Concrete, the signal is immediately drop down. To prevent this add WI-FI extender to between client and router at middle. It is easy but if you don’t have Wi-Fi extender or you don’t want to buy and you may build own Wi-fi extender system for fun. Let’s build it.
Requirements
- 1 Nodemcu or ESP8266
- Arduino IDE
- Good router to configure Route settings
- Skillful hands and patience
I don’t want to explain how to setup Arduino ide for ESP8266. Too many guidelines at the internet.
I make a research for extending Wi-Fi range with NodeMCU but most of them looks too complicated for basic users and they are try to solve routing issues on ESP8266 side and requires some program to burn firmware to ESP. I don’t want to do this. Because when I use These library’s I don’t use my other codes. You can see at source code loop part is empty. You can write other codes to esp. It can handles your Software and Wi-Fi extending.
Let’s begin
Software on the ESP8266
You can see main code is under 20 lines, excepts library’s 😁.
Configuration is also is easy. Everything is commented on the code. You can access source code on github and download it there. (Please follow me on GitHub for other projects.😊) You can get source with git git clone git@github.com:ahmetozer/esp8266-router.git command or Download as ZIP.
After downloading source code, open esp8266-router.ino file with Arduino IDE.
Change Configurations for your own settings.
#include <ESP8266WiFi.h>
// Write Your Router SSID which is your Wi-Fi name and your Wi-Fi password.
const char* ssid     = "ahmetozer.org";
const char* password = "MyhomeNetworkPass";
// Your ESP Wifi
const char* ssid_soft_ap     = "ahmetozer.org2";
const char* password_soft_ap = password;          // My preference is same as my home ssid password.
int Wifi_SoftAP_Channel      = 11;
// ESP 8266 Local Network Configuration
IPAddress local_IP(10,0,1,1);
IPAddress gateway(10,0,1,1);
IPAddress subnet(255,255,255,0);
// Rename Your ESP name to find easily on your router
const char* espHostname =     "WifiReperater2";
void setup() {
  WiFi.mode(WIFI_AP_STA);
  WiFi.begin(ssid, password);
  while (WiFi.status() != WL_CONNECTED) {
    WiFi.hostname(espHostname);
    delay(500);
  }
  WiFi.softAPConfig(local_IP, gateway, subnet);
  WiFi.softAP(ssid_soft_ap, password_soft_ap, Wifi_SoftAP_Channel);
}
void loop() {
}
As I mentioned loop part is empty. You can use esp8266 as Wi-Fi extender and IOT device.
- Set your Home router WiFi SSID and password
const char* ssid = "ahmetozer.org"; const char* password = "MyhomeNetworkPass"; - Set your ESP Wifi name, password and channel
const char* ssid_soft_ap = "ahmetozer.org2"; const char* password_soft_ap = password; int Wifi_SoftAP_Channel = 11; - Set your sub local network on ESP8266. Note: Do not forget to change net block on every ESP. For example first ESP use “10.0.1.1” and second one “10.0.2.1”, like that.
IPAddress local_IP(10,0,1,1); IPAddress gateway(10,0,1,1); IPAddress subnet(255,255,255,0); - Set each ESP8266 hostname to find easily on router.
const char* espHostname = "WifiReperater2";
The Router Setting Part
This part is the unique part from other guidelines for project. Requests from ESP8266 connected devices is not natted. So when the packet created from mobile phone it passes over ESP but Router does not recognize to find path for ESP8266 sub network. So we will create new route on router.
Find Your ESP8266 Ip address on your router. For example mine is (192.168.2.140).
Go to advanced route setting on router.
Add new rule like a below image.
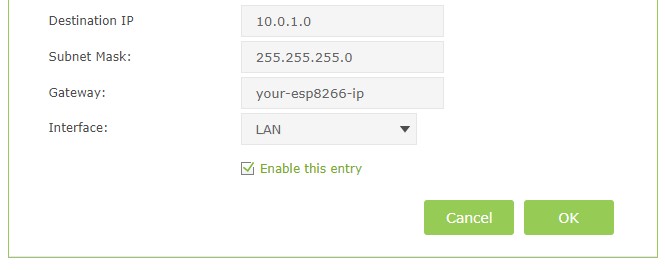
Now your router knows how to redirect packets to ESP8266 sub network.
I make comparison between C.H.I.P and Nodemcu. In previous I write a guide line for how to prepare Wifi Hotspot on Linux.
Advantages of Nodemcu.
- It is small.
- Low battery consumption.
- Fast bootup. (Everything is ready under 10 second)
- Installation is easier.
Advantages of Linux hotspot
- Advanced network control.
- Built in VPN is also usable.
- No configuration requires on Router. It has a built in NAT feature.
- IPv6
- Higher speeds.
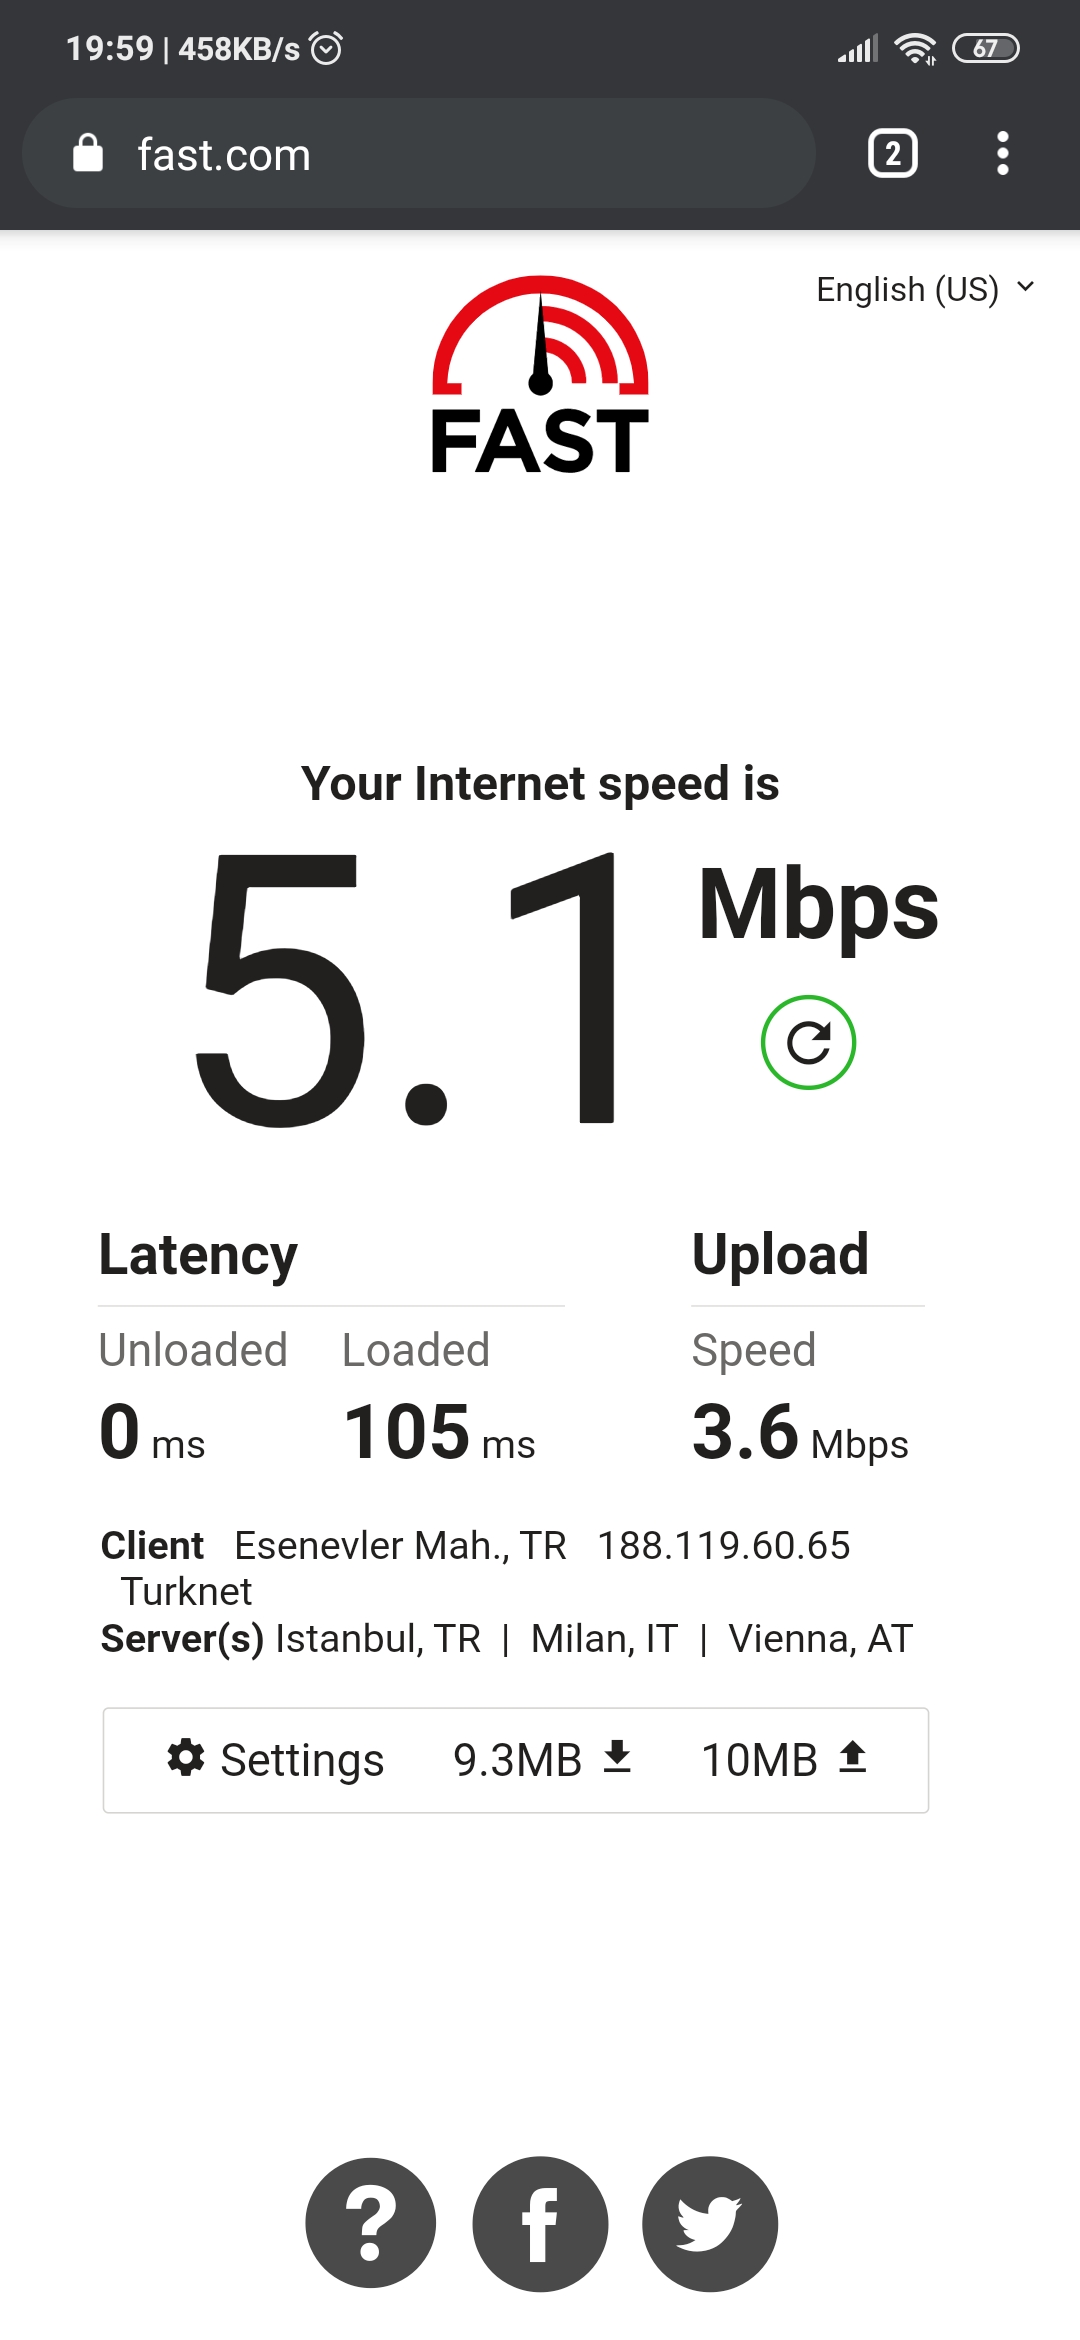
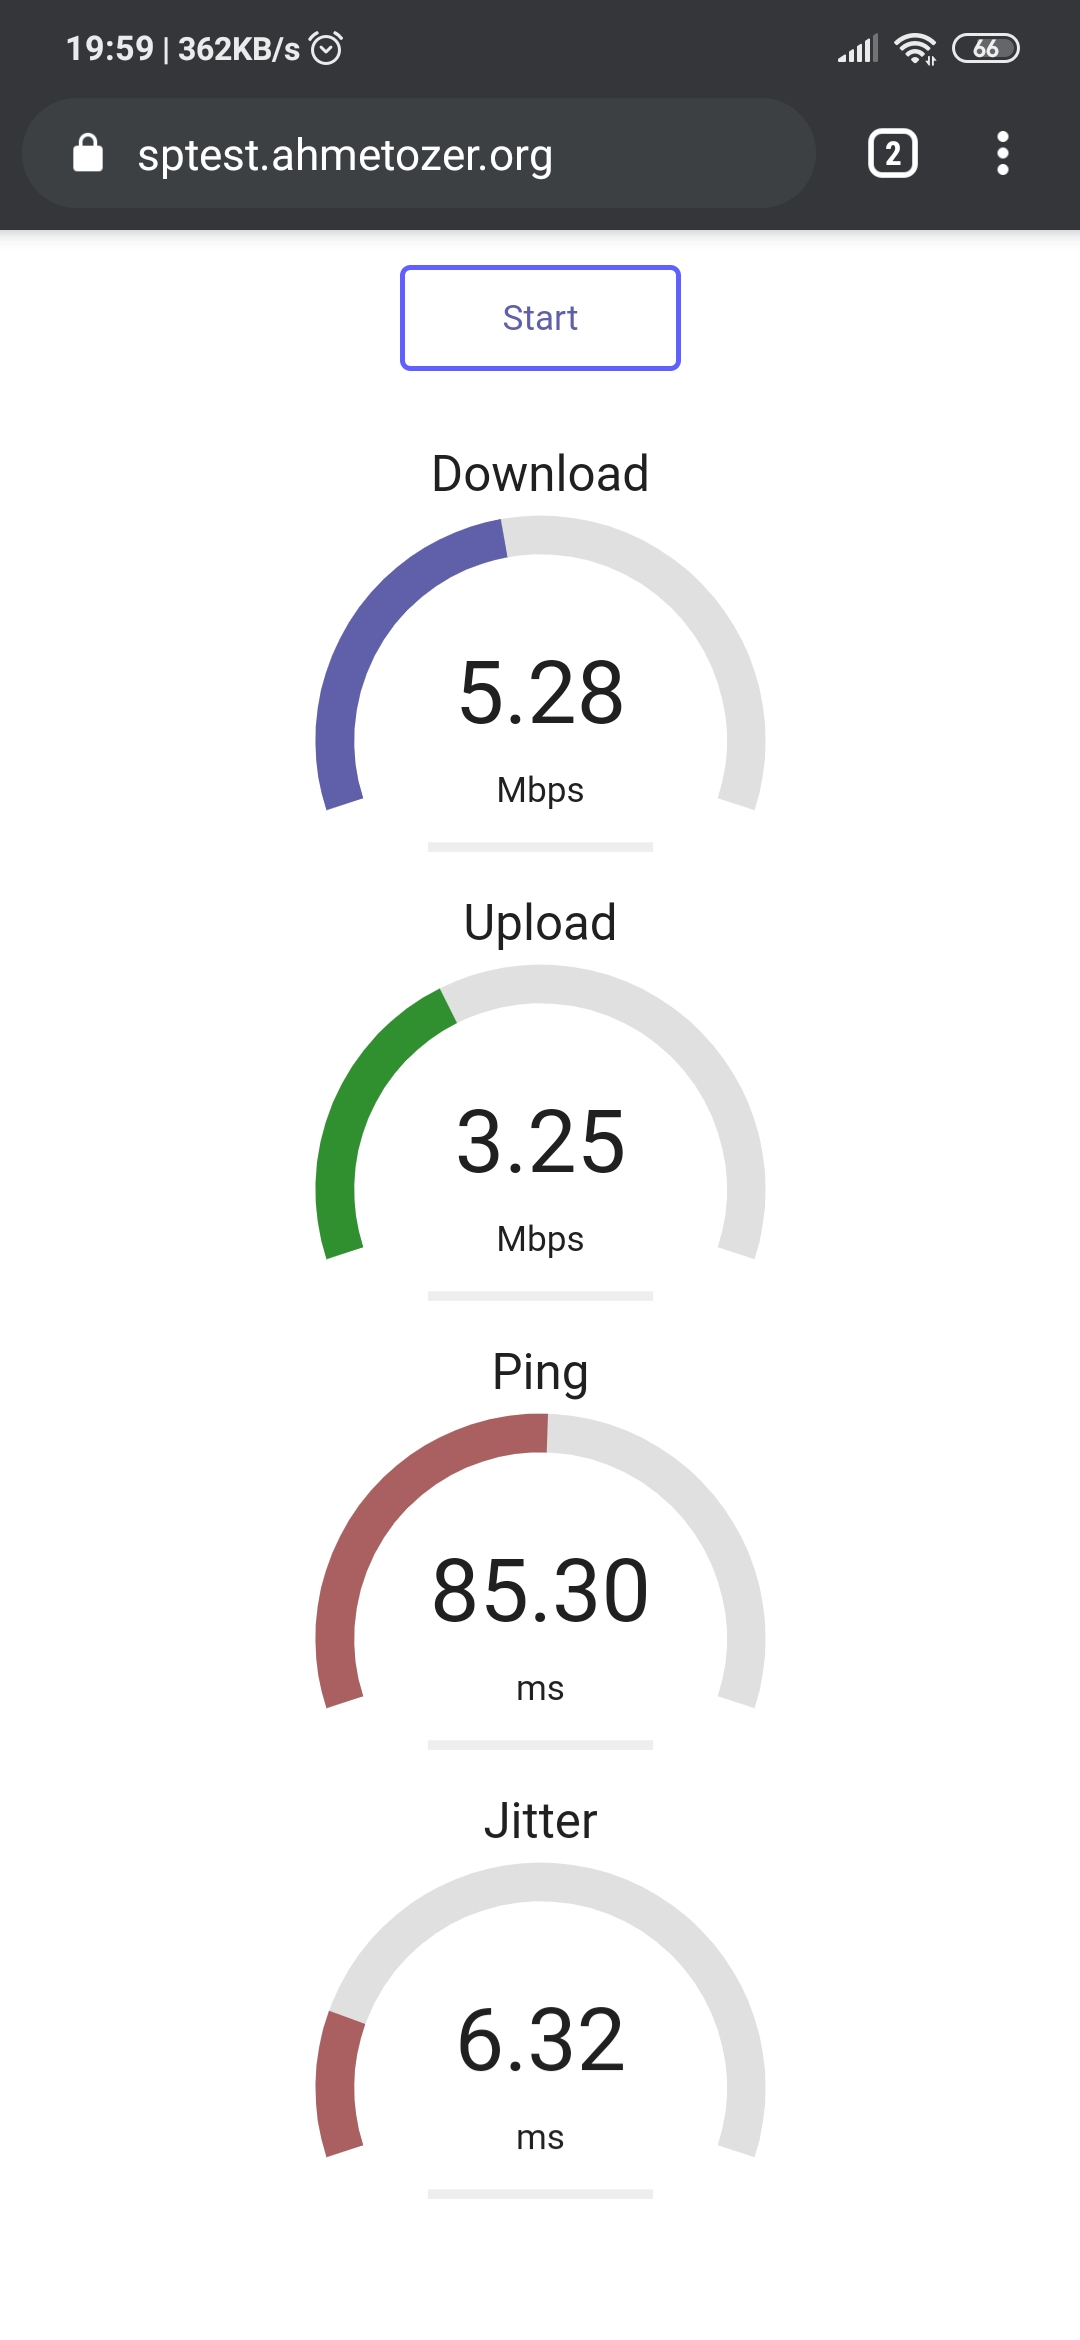
Speed Test
| fastly | HTML5 |
|---|---|
 |  |