Bypass ISP's UDP Proxy
on Blog
Transparent proxies are widely used for tracking, blocking, optimizing and analyzing. These applications vary from company to company and protocol.
For a very long time, I have been informed that there is a proxy between server and client on some protocols but this does not affect my network performance and I don’t take action about that.
But when I try to use a different type of protocol at the proxied port such as uping application on DNS port, ISP middle where proxy does not recognize my custom packet and the server response does not return to me.
Detecting Problem
There is a two negative effect of my current ISP’s MiTM proxy, first one is only working on designed connections. The second one is the source of client UDP ports that are changed on every reply sent from the server.
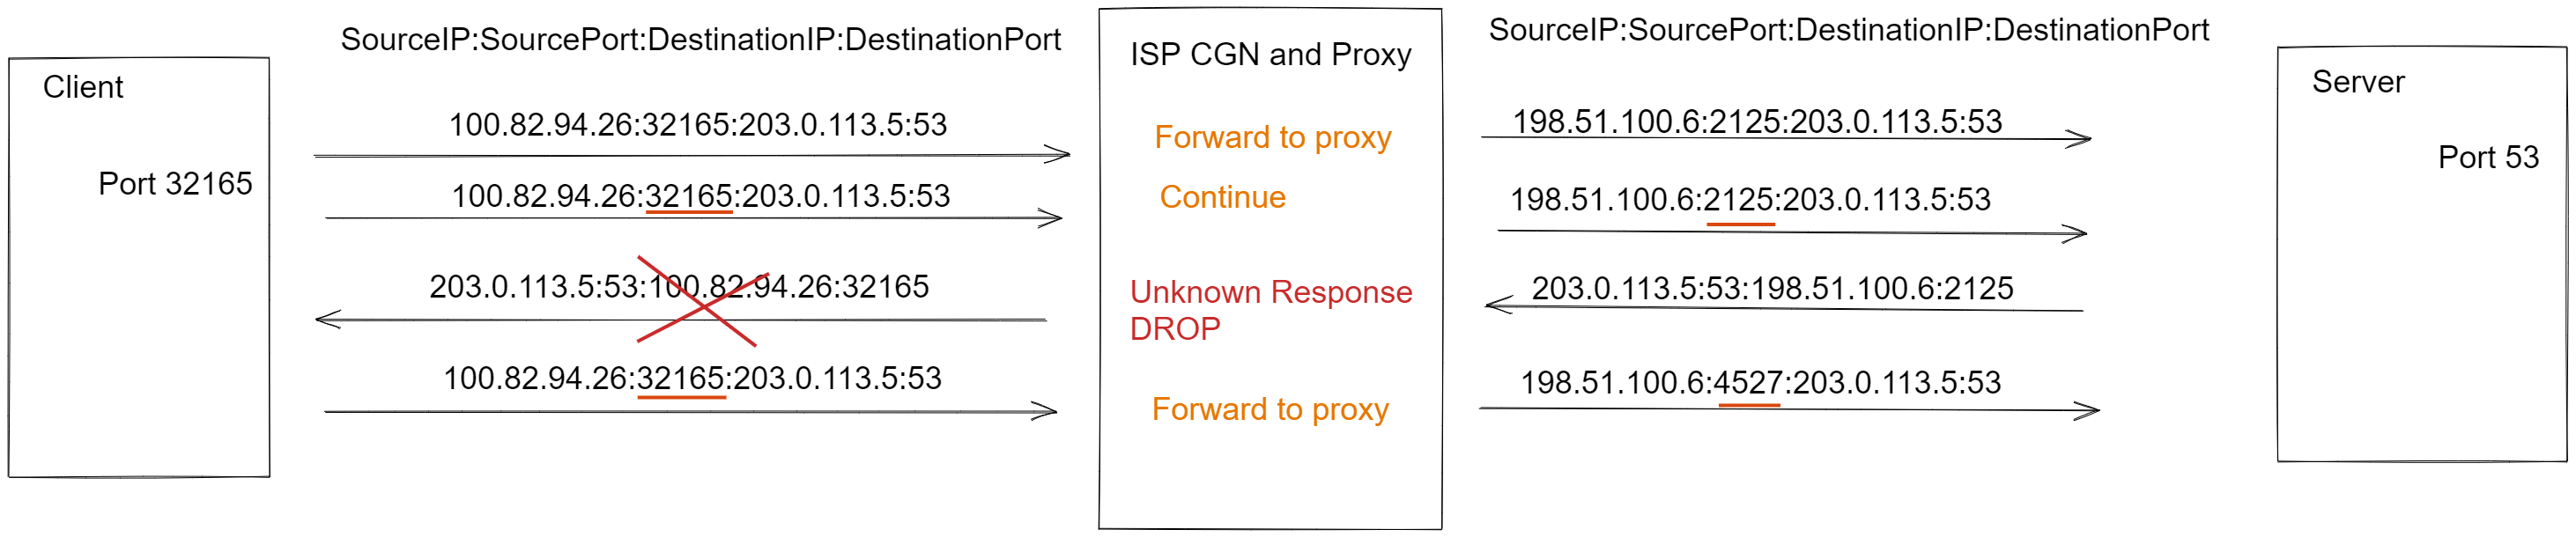
If the server does not have the drop response packet, this MITM still creates a problem. For example, start netcat as a UDP server and try to send a few packets from both sides. After the first response created from the server, the client source port is changed on the ISP side and the new source port is not accepted from the server.
Designing a Solution
The ISP’s MiTM is only working on some specified ports. Running proxy service on all ports will increase computing cost on their side and also due to many customized protocols, it will be breaking their customer connections.
We can bypass this filtering issue by using a different port, VPN or tunnelling systems but these are not appropriate for me. I don’t want to add any new hop between server and client. We have to find and design a new method to confuse their network rules to bypass their MiTM.
Let’s consider other connections, on the customer side, the client sends the first packet but this packet is not ready to send internet backbone due to the client being in a shared address space (NAT444 - rfc6598).
I don’t have any idea about ISP’s hardware, configuration and software. As in the past, again I think about their engineering to create a solution about what they can build or buy a system that can be optimized to a large scale.
Here is my assumption. Firstly ISP NAT service looks like the source port is an established connection. If it’s not, the LSN service is looking for a free port for the ISP customer. Also, that time Firewall service checks are any combination of Protocol, IP and port in any custom rule. If it’s in a rule, the service takes a given action. To reduce compute cost, if the connection is established, the service does not check any kind of rule, just make a Network Address Translation at a large scale.
Testing The Produced Idea
To test my idea, I create a minimal experiment with the netcat application. Firstly I create a regular connection to ensure their system. On the server-side, I start to listen to UDP port 53 with the netcat -l -u 53 command, for the client-side netcat -u serverIp 53.
Here is a result on the server side.
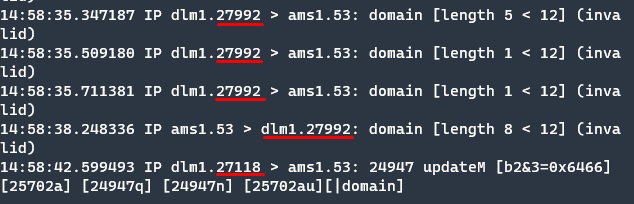
With the first response, the client source port is changed but in reality, I don’t make any change on the client side. This is the proof of MiTM proxy.
Let us try my assumpted idea, can we bypass the system? Again on the server-side, I use the same command to start the UDP server on port 53, but also this time I require another port to send fake packets. For prohibiting ICMP type 3 responses from the server, we can start to listen to fake UDP servers or just block outgoing ICMP responses. For this demonstration, my choice is blocking ICMP responses.
This time on the client-side, the netcat command is a bit different. For testing the idea we have to use the same source port for the fake packet and the second real packet. Normally netcat client selects available client ports randomly in the sys client port range and of course, this is not appropriate for our test case. While using netcat in client mode, we can define the client port with the “-p” option.
The first command is netcat -u serverIp 3006 -p 34698 and then I send only one packet to the server. After seeing the packet on the server-side, I re-execute the netcat command but this time the destination port is 53. I send a few packets to the server and on the server-side, I reply to their requests and re-send a few packets.
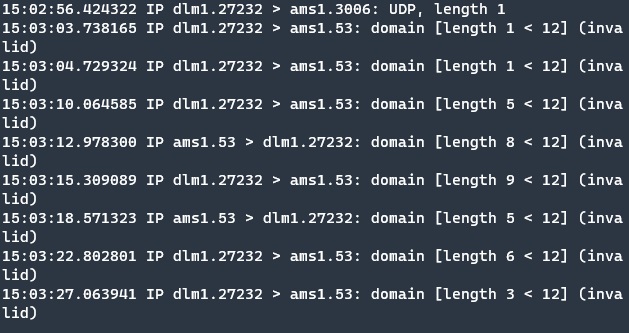
You can see this time the result is different on the server side. After the server responses, the client port is not changed that time and the connection continues. Looks like an assumption is a work.
Designing a System
In the past section, we found a solution to the problem. Now we can design a system that automatically catches the packet and create a fake packet before the real packet is going to the cable.
Requirements For The System
We have to only catch DST port 53 traffic and then forward these packets to the program. While routing packets to the program, also we ensure that nothing can go to the ISP before the system creates the packet. The program will create a fake packet that is the same source IP and port and send it to the ISP. Then send the original packet. The fake packet destination port will be different not in the filtered range. It does not break other connections. Easily monitorable for problem-solving.
Optimizing The System
The fake packet generator runs at the userspace level. Due to multiple times border crossing and other reasons, it will be consuming more resources when we compare the normal routing. Also with much user-level processing, it will be adding a delay to catch and send operations. We don’t need to process all packets on established connections. We only need this MiTM proxy at the beginning of the connection to trick ISP’s system. So we have to know the state of the connections.
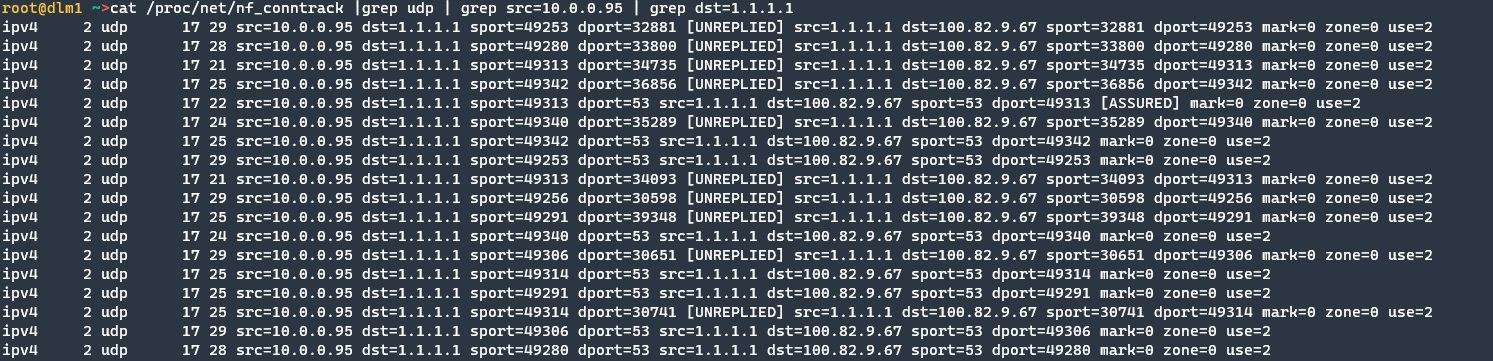
This job can be done with nf_conntrack.
Implementation Stage
Python has a good library which is scapy. With this library, we can capture UDP packets, create a fake packet and then send an original packet to the destination. While the design stage it is good to run in a different network namespace to keep control and monitoring. Containers are run in their own namespaces and work very well on many platforms. So for easy installation and namespace features, I start to build systems in containers. The program starts at docker and then forwards the request to the system, but by default vEth network interface names are not easy to find and figure out which interface is related to the container. And also I want to use different interfaces for incoming and outgoing traffic for more easily tracking. So I connect my own vEth’s to the containers and configure with a bash script. They had their own IP address and the system printed interface IP’s.
The program and container are ready to manipulate requests. Now that time, we can configure Netfilter to forward packets to the system.

The source of the program https://github.com/ahmetozer/bypass-isp-udp-proxy.
We can define a custom route with ip rule dport option with a custom table but as we mentioned previously we don’t want to forward all packets due to performance optimizations.
Iptables has a --ctstate option and this option supports the detecting NEW packets, which well fits this purpose for forwarding first packets. Also only we forward a packet which comes from the indicated interface otherwise it can create a loop until TTL reaches zero.
iptables -t mangle -I PREROUTING -i eth0 -m conntrack --ctstate NEW -p udp --dport 53 -j MARK --set-mark 353
We mark all packets coming from the ethernet interface end destination port 53 are marked to 401. So I created an IP rule to the route marked packets to the python application.
ip rule add fwmark 353 lookup 401
ip route add default via 10.0.9.2 dev pm-in1 table 401
And nothing works. Of course, it should not be that easy. They have to have some problem otherwise, it is not that funny.
When I inspect the network traffic, it is a very seenable problem that appears on the ppp0 interface. Packets that are created from the container, the NAT rules do not apply to these packets. I already configured iptables to apply NAT on all outgoing packets but for some reason NAT did not work. So I changed my NAT rules to test different configurations that might work but nothing works on it.
We can solve this issue with a new namespace, create a bridge on eth0 and set getaway in-home devices to bridges namespace IP address. So we can forward new connections at that namespace and if it’s established, that namespace stops forwarding packets to the python application and the main namespace can still apply NAT to the ppp0 interface. While explaining this to you, it requires many changes on my home and packets many times pass in the device virtual network. So I start to find a new way to solve this issue without having such a long and complex solution method.
Iptables also has a TEE jail. This jail copies the packets to the given getaway. So I redesign my firewall rules to fit this option.
iptables -t mangle -A PREROUTING -i lan1 -p udp -m conntrack --ctstate NEW -m udp --dport 53 -j TEE --gateway 10.0.9.2
Let’s look at ppp0 interface traffic.
tcpdump -i ppp0 host 1.1.1.3 -n
IP 100.82.9.67.49461 > 1.1.1.3.53: 9598+ A? google.com. (28)
IP 100.82.9.67.49461 > 1.1.1.3.53: 9598+ A? google.com. (28)
IP 100.82.9.67.49461 > 1.1.1.3.33299: UDP, length 28
IP 100.82.9.67.49461 > 1.1.1.3.53: 9598+ A? google.com. (28)
We ensure that the last 2 packets come from the container, the first packet is the real packet but where comes from the second packet? By default container network does not drop on come network traffic, it forwards to their getaway. It is easy to fix this issue with disable net.ipv4.ip_forward option in the container.
If the first packet is not dropped, this whole system will not work. I hope that cstate NEW rule is reusable with the drop option and this rule does not break anything on the system.
iptables -t mangle -A PREROUTING -i lan1 -p udp -m conntrack --ctstate NEW -m udp --dport 53 -j DROP
The last time we inspected the ppp0 interface and the result makes me happy and also second packets are not going to the proxy application.
tcpdump -i ppp0 host 1.1.1.3 -n
19:42:01.546851 IP 100.82.9.67.49461 > 1.1.1.3.33299: UDP, length 28
19:42:01.619529 IP 100.82.9.67.49461 > 1.1.1.3.53: 9598+ A? google.com. (28)
The designed system meets the requirements and successfully works.
With this system, I can now use port 53 for different purposes other than dns.
Thank you for reading. I hope you liked this blog. If so don’t forget to share, stay safe and see you in the next blog.